Loading, please wait!
Parent Help Centre & FAQ
Struggling with the system or have a specific question? Have a look at the FAQ below. If you can't find the answer to what you're looking for or still need help, get in touch here.
Help with login & registration
Your school or club will have their own unique MagicBooking URL, navigate to it to login or register a new account.
If you don’t know your school’s or club’s unique MagicBooking URL you can login here: https://www.magicbooking.co.uk/parent-login
To login, fill in the email and password you have used to register your account.
If you have forgotten your password, click the ‘Forgot Password?’ link below the email and password input fields.
Enter the email address you have registered your MagicBooking account with and submit your request.
An email will be sent to your registered email address with a link to reset your password.
Click the link to reset your password, follow the steps, and navigate back to the login once reset.
If you have been added to MagicBooking as an additional account holder, you can login by resetting your password with the email address assigned to your account by the main account holder.
For help on how to reset your password, click here
To register an account, navigate to your school’s or club’s unique MagicBooking URL and click ‘Don't have an account yet? Create one here’.
If you don’t know your school’s or club’s unique MagicBooking URL and you are trying to create an account on the MagicBooking commercial website, you won’t be able to create an account here, if you need to create an account please contact your school or club or email info@magicbooking.co.uk
Follow the steps and enter the information to create your account.
Once submitted, an email will be sent to your email to validate your account.
Once validated, you’ll be able to login to your account. From here you can navigate to the ‘Children’ section to add a child to your profile.
Need more help? Watch the video below on how to create your MagicBooking account
Help with the dashboard
On the home page/dashboard, you’ll be able to see all your notices from your school or club and your upcoming bookings as well as have quick access to book an activity.
Notices are a way for your school/club to notify you on any news or updates surrounding their provision.
Notices will also show you warnings and information about your MagicBooking account.
Click on a notice to see more details.
Help with booking an activity
To book an activity, navigate to the ‘Book Activity’ section. Here you will see all the activities offered by the centres you are registered with.
If you can’t see any activities, it may be because you haven’t registered your account with any centres. For help on how to add a centre, click here
You can filter activities by the centre they are linked to at the top of the page.
Select a centre in the dropdown list and only activities linked to this centre will be shown.
Activities are displayed as cards and each card contains some information about the activity.
Further details about an activity can be viewed if you click on the ‘Read more’ button on an activity card.
From top to bottom, each activity card shows the:
- Centre name – the centre the activity is provided at
- Ages – the age range the activity is restricted to
- DOB – the date of birth range the activity is restricted to
- Classroom(s) – the classrooms the activity is restricted to
- Activity name – the name of the activity
- Activity dates – the date range the activity is running
- Booking type – the booking type of the activity, to understand the different booking types and their meaning, click here
- Runs on – the days of the week the activity runs on
- Pricing – shows a preview of the pricing for sessions in the activity
- Description – a description of the activity
- Special needs – any information relating to the accommodation of special needs children for the activity
- Disabilities – any information relating to the accommodation of disabled children for the activity
- Media – any media attachments for the activity, e.g. a PDF or an image
Each activity has its own booking type which affects how you can book the activity. There are a total of 6 activity booking types:
- Daily – allows you to select your session and book a date range or ad-hoc (individual) days.
- Weekly Booking – allows you to select your session and book one or more whole weeks.
- Contract – allows you to select your session and book any day(s) of the week, for the entire period the activity runs on.
- Whole Season – allows you to book for the entire time and every day of the week the activity runs on, you can’t select your session or dates.
- Slot Booking – allows you to select a specific date and time per child, used for parents evening.
- Trip – allows you to book a one-off trip, you can’t select your session or dates.
Need more help? Watch the videos below on activity booking types.
Navigate to the ‘Book Activity’ section, find the activity you would like to book, and click the ‘Book’ button. From here you can follow the steps to book your activity.
There are 4 – 5 steps to complete your booking.
Step 1 – Book Sessions
- Here you will select the children you’d like to book the activity for, the session you’d like to book, and the dates you’d like to book.
- The ability to pick your session and dates will depend on the activity booking type. To learn what each activity booking type means, click here
- Once you have selected your child, session, and dates you can confirm your selection by clicking the ‘Add Dates’ button. From here you can add more dates for a different child/session, or you can continue with your booking by clicking the ‘Next’ button.
Step 2 – Check Availability
- Here you can check the availability of the dates you’ve selected on the previous step.
- You can see the dates you've selected week by week with the week tab picker or you can view all the dates in a calendar view.
- Navigating from tab to tab will show you the dates selected along with additional information and the ability to select/unselect specific days if you wish to remove them from your booking.
-
The check availability step works on a traffic light system:
- Green – full availability, if all days selected in the week are available
- Orange – partial availability, if some of the days selected in the week are available and some aren’t
- Red – no availability, if none of the days selected in the week are available
Step 3 – Extra Options
- If an activity has extra options linked to it, you’ll be able to select the extra options for each child in your booking.
- The availability of the extra option works the same way as the previous step, with the traffic light system.
- If you have a booking with many dates and want to select the extra option for all the dates, you can do so by clicking the checkbox under the child’s name.
Step 4 – Booking Recap
- Here you’ll be able to see all the information about your booking before proceeding to checkout.
- You can view the activity and sessions you have booked, the number of sessions, the children booked, and the cost of the sessions and booking.
- You can view the dates booked in a calendar view.
- If you made a mistake or no longer want to book the activity, you can delete it from your basket.
- If you want to add another activity before checking out, you can do so by clicking the ‘Add another activity’ button.
- You will see a breakdown of your booking totals and have the option to add a promo code.
- When you are ready to checkout, click the ‘Proceed to Checkout’ button.
Step 5 – Checkout
- At checkout, you’ll be able to select how you’d like to pay for your booking. MagicBooking currently supports up to 8 different payment options.
- Each activity has its own settings defining which payment types are allowed so if you don’t see 8 options, don’t worry.
- To learn more about how you can pay for your booking, click here
Help with checkout & payments
Paying via Bank Transfer allows you to directly authorise the payment from your banking app. You don’t have to enter any card details, making it simple, effective, and secure.
Select the ‘Bank Transfer’ option on checkout and proceed to the next step to select your bank.
Once you’ve selected your bank, you’ll be redirected to your banking app where you can authorise the payment.
Once authorised, you’ll be taken back to MagicBooking and if successful your booking will be confirmed.
Select the ‘Credit/Debit Card’ option on checkout. Your billing details will automatically be pulled from your account details. If you’d like to pay with a card that has different billing details to those on your account, you can edit it by clicking the ‘edit’ button and saving your changes.
Once you are happy with the billing details, proceed to the next step to enter your card details and make your payment.
If your payment is successful, you’ll be taken back to MagicBooking and your booking will be confirmed.
If you’d like to spread the cost of your booking, select the ‘Split into monthly payments’ option on checkout.
You have 4 different payment options when splitting payments into a monthly instalment plan:
- Credit/Debit Card
- Tax-Free Childcare Vouchers
- Other Childcare Vouchers
- Standing Order
Select the ‘Tax-Free Childcare Voucher’ option on checkout.
If you haven’t already done so, you’ll be able to connect your HMRC Tax-Free Childcare account with MagicBooking. For more information on how to connect your account, click here
Check that your account balance can cover the amount you are paying by Tax-Free Childcare voucher. If you don’t have enough funds on your account, you can click the ‘Top-up’ button to add money to your account.
If not already populated, enter the Tax-Free Childcare unique reference number for each child in your booking.
Select the amount you would like to pay by Tax-Free Childcare voucher, you can cover the full amount or a partial amount.
If you select a partial amount and there are multiple children in your booking, you’ll have to specify the amount to be paid by Tax-Free Childcare for each child.
If you cover a partial amount, you’ll have to pay for the rest of the booking with another payment option.
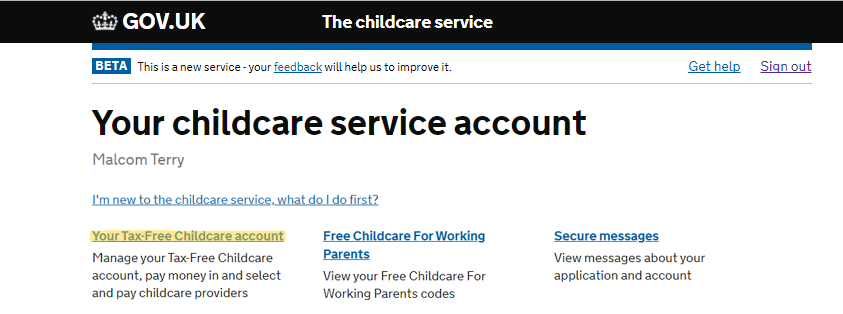
Navigate to your Tax-Free Childcare account, click here to sign in
-
Click on the 'Your Tax-Free Childcare account' link pictured in the image below
-
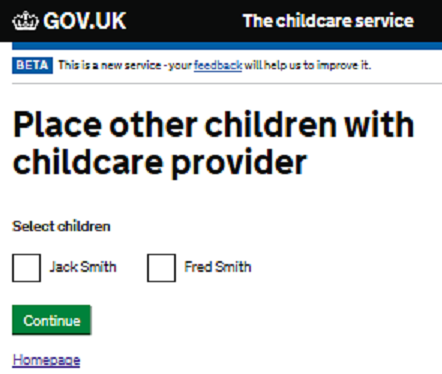
Click on the child account you need to link the childcare provider to
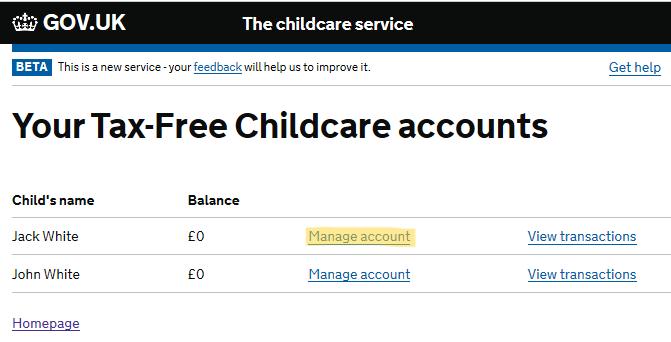
-
Click on 'Add Childcare Provider' button at the bottom of the page
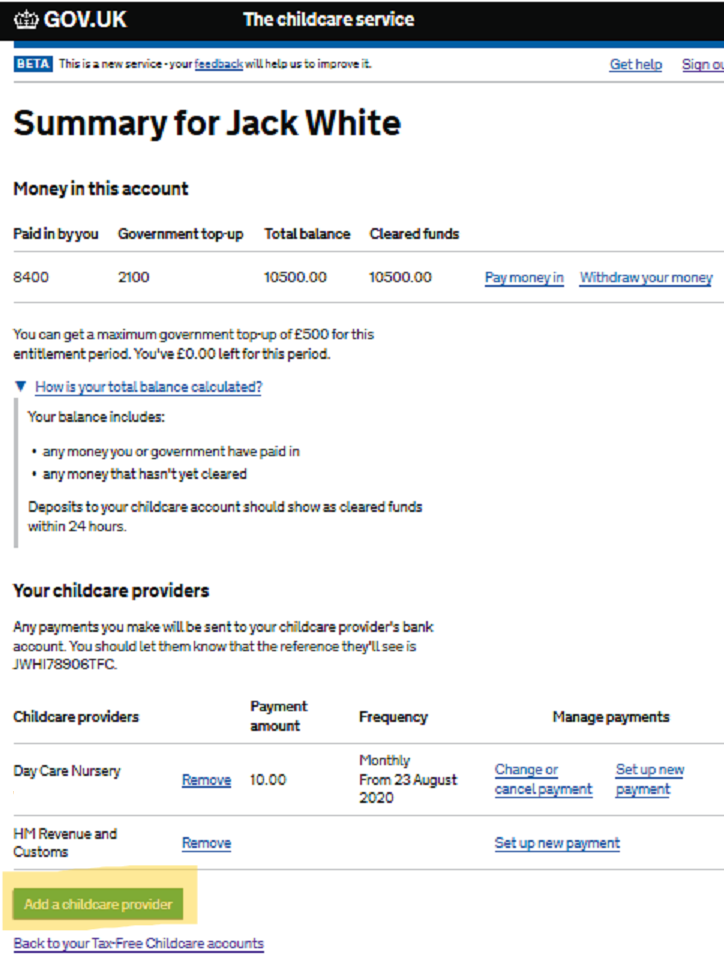
-
Search for the childcare provider by their name, registration code, or postcode. You can find these details for each centre on your MagicBooking account by going to 'Account' -> clicking the 'Centres' tab. Here you will see the relevant information in the 'Tax-Free Childcare Info' column.
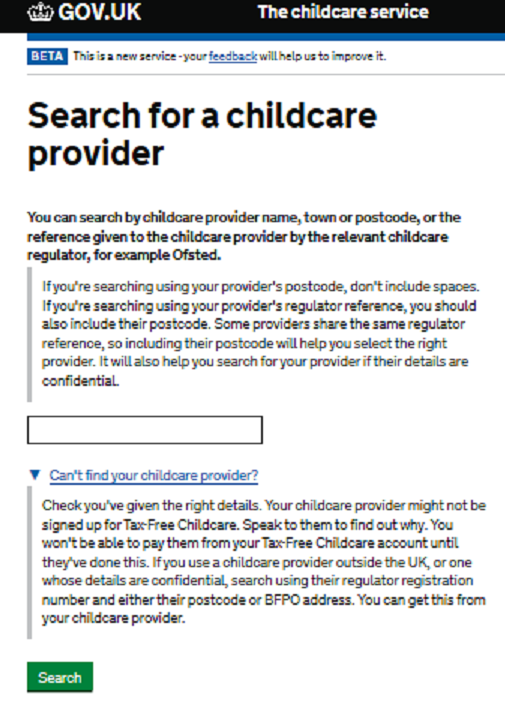
-
Select the childcare provider from the list and click 'Continue'

-
If you have more than one child on your Tax-Free Childcare account, you can choose to also link the selected childcare provider to their account. Once finished, click 'Continue'
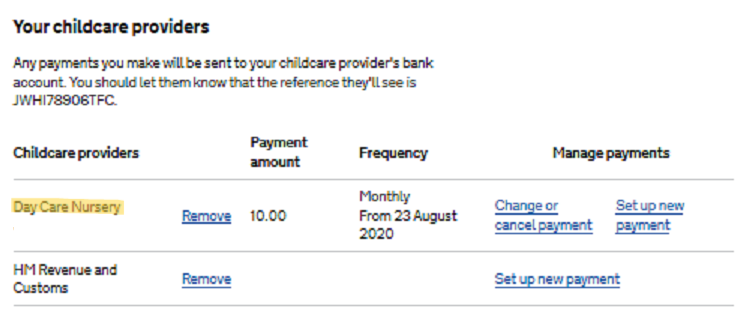
You're childcare provider should now be linked to your child's Tax-Free Childcare account. You can confirm this by checking the 'Your Chidlcare Providers' section of your childs account and making sure the providers name is in your list.
Select the ‘Other childcare voucher’ option on checkout, choose your childcare voucher provider, and specify the amount you would like to cover with the voucher.
You can cover the full amount or a partial amount.
If you cover a partial amount, you’ll have to pay for the rest of the booking with another payment option.
If you have credit on your account, you’ll be able to select the option to apply the credit on checkout.
If your credit only covers a partial amount, you’ll have to pay for the rest of the booking with another payment option.
To learn more about the different types of account credit you can have, click here
Select the ‘Pay Later’ option on checkout and submit your booking.
You’ll have to cover the cost of the booking at a later date.
Help with the e-shop
To view the e-shop, navigate to the ‘E-Shop’ section.
Here you will find all the items your school or club has listed in their E-Shop.
Some items are restricted by quantity per child, so you’ll only be able to purchase as much of the item as the max quantity allows.
To buy an item from the e-shop, navigate to the ‘E-Shop’ section. Find the item you’d like to purchase and add it to your basket.
When you are happy with your selection, click the ‘Checkout’ button.
You’ll be taken to a recap page where you can review what’s in your basket and the total of the basket. As well as this you’ll be able to select what centre you’d like to collect your item at, if there is an option to chose from.
Click the ‘Pay Now’ button to be taken to the payment stage to complete your order.
To view your past e-shop orders, navigate to the ‘E-Shop’ section and click the ‘View My Orders’ button.
Here you’ll see a list of all your past orders.
To pay for an outstanding e-shop order, navigate to the ‘E-Shop’ section and click the ‘View My Orders’ button.
Click the ‘View’ button against the e-shop order you’d like to make a payment for.
You’ll be taken to the orders detail page where you can click the ‘Make a Payment’ button to make a payment.
Help with my bookings
To view your bookings, navigate to the ‘Bookings’ section.
Here you’ll be able to see a list of all your bookings, past, present, and future.
Archived bookings are bookings with no outstanding payments that are 30+ days old.
These are kept in a separate list to keep the list of newer bookings streamlined for easy navigation.
To view your archived bookings, navigate to the ‘Bookings’ section and click on the ‘Include Archived Bookings’ button. To remove the archived bookings from the list, click on the button again.
To view your bookings in a calendar, navigate to the ‘Bookings’ section and click the ‘Calendar View’ button.
Here you’ll be able to select which activities and children you want to see in the calendar. Once you have made your selection, click ‘View Calendar’ and you will see all the bookings in your selection in a calendar view.
Your account balance reflects any outstanding or overdue payments and any credits on your account.
If you have an outstanding payment and no credits on your account, your balance will be negative to indicate the amount outstanding.
If you have sufficient credit on your account to outweigh any outstanding payments, your balance will be positive to indicate the amount in credit.
You can have two types of credit, normal credit and CCV credit. CCV credit indicates payment made on your account using childcare vouchers.
CCV credit can only be used to pay for childcare and not for things like the E-Shop.
Normal credit can be used on anything.
To view your account balance, navigate to the ‘Bookings’ section.
Here you’ll be able to see a breakdown of your account balance.
To view your overdue balance, navigate to the ‘Bookings’ section.
Here you’ll be able to see your overdue balance.
To make a payment for one or more bookings, navigate to the ‘Bookings’ section.
Select one or more bookings you’d like to make a payment for by checking the checkbox against the booking in the list and then click the ‘Make a payment’ button.
Here you’ll be taken to a recap page where you can view what you are paying for before proceeding to checkout.
To view your upcoming instalments, navigate to the ‘Bookings’ section and click on the ‘View’ button in the ‘Upcoming Instalments’ section.
Here you’ll see a list of all your upcoming instalments within the next 3 months with a link to go directly to the relevant booking.
You won’t be able to see past instalments in this section; if you wish to view specific past instalments navigate to the booking and view more details. To learn how you can view more details for a specific booking, click here.
To view more details about a booking, navigate to the ‘Bookings’ section and click on the ‘View’ button in the list next to the booking you wish to see in more detail.
You’ll be taken to that bookings page where you can see all the information relating to it.
To view the dates booked in a booking, navigate to the ‘Bookings’ section and click on the ‘View’ button in the list next to the booking you wish to see in more detail.
Here you can see all the dates booked within the booking as well as their status under the ‘Dates Booked’ tab.
To view the payment made on a booking, navigate to the ‘Bookings’ section and click on the ‘View’ button in the list next to the booking you wish to see in more detail.
Here you can see all the payments made on the booking under the ‘Payments Made’ tab.
To view the expected payments on a booking, navigate to the ‘Bookings’ section and click on the ‘View’ button in the list next to the booking you wish to see in more detail.
Here you can see all the expected payments on the booking under the ‘Expected Payments’ tab.
To amend your booking, navigate to the ‘Bookings’ section and click on the ‘View’ button in the list next to the booking you wish to amend.
You can add or cancel dates to a booking.
Adding Dates
- To add dates, select the add dates checkbox and enter the required fields, and click ‘Check Availability’.
- You will see a list of all dates within your search criteria and their booking availability.
- You can select/unselect whichever dates you wish to add and do the same for any extra-options the activity may have.
- Once you are happy with your selection, click the ‘Add Dates’ button to add your selected dates to your booking.
Cancelling Dates
- To cancel dates, select the cancel dates checkbox and enter the required fields, and click ‘View Dates’.
- You will see a list of all dates within your search criteria.
- You can select/unselect whichever dates you wish to cancel and do the same for any extra-options the activity may have.
- Once you are happy with your selection, click the ‘Cancel Dates’ button to cancel your selected dates from your booking.
To view invoices/credit notes for a booking, navigate to the ‘Bookings’ section and click on the ‘View’ button in the list next to the booking you wish to see in more detail.
Here you can see all the invoices/credit notes for the booking under the ‘Invoices/Credit Notes’ tab.
Help with my account
Navigate to the ‘Account’ section.
Here you’ll be able to view all your account information as well as view your saved cards, statements, obtain payment proof, and add additional account holders.
To edit your account details, navigate to the ‘Account’ section and click the ‘Edit account details’ button.
Here, you’ll be able to edit and save all your account details.
To delete your account, navigate to the ‘Account’ section and click the ‘Edit account details’ button.
Here, you’ll see a ‘Delete Account’ button in the Right to be Forgotten section. This will send a request to your school’s or club’s admin to delete your account.
To view MagicBooking’s T&Cs and Privacy Policy, navigate to the ‘Account’ section. In the ‘Preferences & T&Cs’ section you will see a hyperlink to open the T&Cs and Privacy Policy.
Click on the hyperlink to open and view the relevant file.
To view your school’s or club’s T&Cs and Privacy Policy, navigate to the ‘Account’ section. In the ‘Preferences & T&Cs’ section you will see a hyperlink to open the T&Cs and Privacy Policy.
Click on the hyperlink to open and view the relevant file.
To connect your HMRC Tax-Free Childcare account with MagicBooking, navigate to the ‘Account’ section and find the HMRC card under the ‘Account Details’ tab.
If you aren’t already connected, you’ll see a button to connect your account. Click on this button, where you will be redirected to the HMRC Tax-Free Childcare GOV.UK portal, and follow the steps to link your account to MagicBooking. Once completed you will be returned to MagicBooking.
Once connected, you’ll be able to see a breakdown of your Tax-Free Childcare account balance, the date and time you last connected your account, and an option to top-up and reload your balance.
To top up your Tax-Free Childcare account from MagicBooking, navigate to the ‘Account’ section and find the HMRC card under the ‘Account Details’ tab.
If you haven’t already connected your HMRC Tax-Free Childcare account with MagicBooking, you’ll have to do this first.
Once connected, you’ll see a ‘Top-up’ button, click this and you will be redirected to the HMRC Tax-Free Childcare GOV.UK portal where you can top-up your account.
To reload/refresh your Tax-Free Childcare account balance, navigate to the ‘Account’ section and find the HMRC card under the ‘Account Details’ tab.
If you haven’t already connected your HMRC Tax-Free Childcare account with MagicBooking, you’ll have to do this first.
Once connected, simply reload the page and your balance will be refreshed.
Navigate to your Tax-Free Childcare account, click here to sign in
-
Click on the 'Your Tax-Free Childcare account' link pictured in the image below
-
Click on the child account you need to link the childcare provider to
-
Click on 'Add Childcare Provider' button at the bottom of the page
-
Search for the childcare provider by their name, registration code, or postcode. You can find these details for each centre on your MagicBooking account by going to 'Account' -> clicking the 'Centres' tab. Here you will see the relevant information in the 'Tax-Free Childcare Info' column.
-
Select the childcare provider from the list and click 'Continue'
-
If you have more than one child on your Tax-Free Childcare account, you can choose to also link the selected childcare provider to their account. Once finished, click 'Continue'
You're childcare provider should now be linked to your child's Tax-Free Childcare account. You can confirm this by checking the 'Your Chidlcare Providers' section of your childs account and making sure the providers name is in your list.
When you pay for a booking with a card instalment plan, the card details you enter at checkout for the initial payment are saved for future instalment plan payments on that booking.
The ‘Saved Cards’ tab in the ‘Account’ section shows you all the cards you have saved on your account that are linked to active instalment plans.
To view your saved cards, navigate to the ‘Account’ section and click on the ‘Saved Cards’ tab.
Here you’ll be able to see all your saved cards.
Centres are the locations where your school or club offers their childcare services/provision.
Each bookable activity is linked to a centre.
Your child may attend one or more centres.
You can register your account to as many centres as you wish.
To view your centres, navigate to the ‘Account’ section and click on the ‘Centres’ tab.
Here you’ll be able to see all centres your account is registered to.
To update your centres, navigate to the ‘Account’ section and click on the ‘Centres’ tab and then click on the ‘Update Centres’ button.
Here you’ll be able to add or remove any centres to your account.
To obtain payment proof for childcare costs, navigate to the ‘Account’ section and click on the ‘Payment Proof’ tab.
Here you’ll be able to filter what transactions you are looking/need payment proof for. Fill out the required fields and click ‘View Statement’ to see a list of all transactions matching your search criteria.
You can download your payment proof statement by clicking the ‘Download’ button.
Additional account holders are individuals you give access to your account and children, so they can make bookings and payments.
Additional account holders won’t be able to see or have access to your bookings unless they are granted full access.
To add an additional account holder, navigate to the ‘Account’ section and click on the ‘Additional Account Holder’ tab and then click the ‘Add account holder’ button.
Here you’ll be able to select the children to share with the additional account holder, as well as the additional account holder’s basic details.
Full access will grant an additional account holder the same level of privileges as you have, meaning:
- The ability to see your bookings and pay for them.
- The ability to use you account credit to pay for bookings of children you have given them access to.
- The ability to update centres (this will only affect the additional account holder's account and won’t affect your main account).
To edit or delete an additional account holder, navigate to the ‘Account’ section and click on the ‘Additional Account Holder’ tab.
Find the additional account holder you’d like to manage and click on the edit or delete button.
Help with my children
Navigatе to the ‘Children’ section and click the ‘Add Child’ button.
Enter your child’s information and follow the steps to create their profile.
Navigatе to the ‘Children’ section and click on the child you would like to view. If there are no children on your account, you’ll have to add one. To see how to add a child to your account, click here.
You’ll be able to view all your child’s details here—click on the different tabs to view, edit, or add to a section.
To edit your child’s details, navigate to the ‘Children’ section, select the child you would like to edit, and click the ‘Edit child details’ button.
Here you’ll be able to edit and save all your child’s basic details.
To add an emergency contact to a child’s profile, navigate to the ‘Children’ section, select your child, and click on the ‘Contacts’ tab.
Here you’ll be able to add new and edit existing emergency contacts.
To add a collector to a child’s profile, navigate to the ‘Children’ section, select your child, and click on the ‘Contacts’ tab.
Here you’ll be able to add new and edit existing collectors.
To add a doctor contact to a child’s profile, navigate to the ‘Children’ section, select your child, and click on the ‘Contacts’ tab.
Here you’ll be able to add new and edit existing doctor contacts.
To update your child’s consents, navigate to the ‘Children’ section, select the child you would like to edit, and click on the ‘Consents’ tab.
Here you’ll be able to edit and save all your child’s consents.
To manage your child’s dietary needs, navigate to the ‘Children’ section, select your child, and click on the ‘Dietary Needs’ tab.
Here you’ll be able to add and edit all your child’s dietary needs.
To manage your child’s allergies, navigate to the ‘Children’ section, select your child, and click on the ‘Allergies’ tab.
Here you’ll be able to add and edit all your child’s allergies.
To manage your child’s medications and auto-injector, navigate to the ‘Children’ section, select your child, and click on the ‘Medications’ tab.
Here you’ll be able to add and edit all your child’s medications, as well as any auto-injectors they may have.
To manage your child’s medical conditions, navigate to the ‘Children’ section, select your child, and click on the ‘Medical Conditions’ tab.
Here you’ll be able to add and edit all your child’s medical conditions.
To manage your child’s SEND, navigate to the ‘Children’ section, select your child, and click on the ‘SEND’ tab.
Here you’ll be able to add and edit all your child’s SEND.